

GPS has made positioning so easy that we almost forget how to locate ourselves any other way. Yet a flat battery, a frozen chartplotter or a swamped antenna is all it takes to leave you without a position in the middle of a coastal approach. The cross bearing remains the go-to method: with a hand bearing compass, a chart and two or three visible landmarks, you can fix your position in under a minute, without electricity. It is also the best way to check that your GPS is not lying to you. This guide breaks the technique down step by step.
1. The principle of the cross bearing
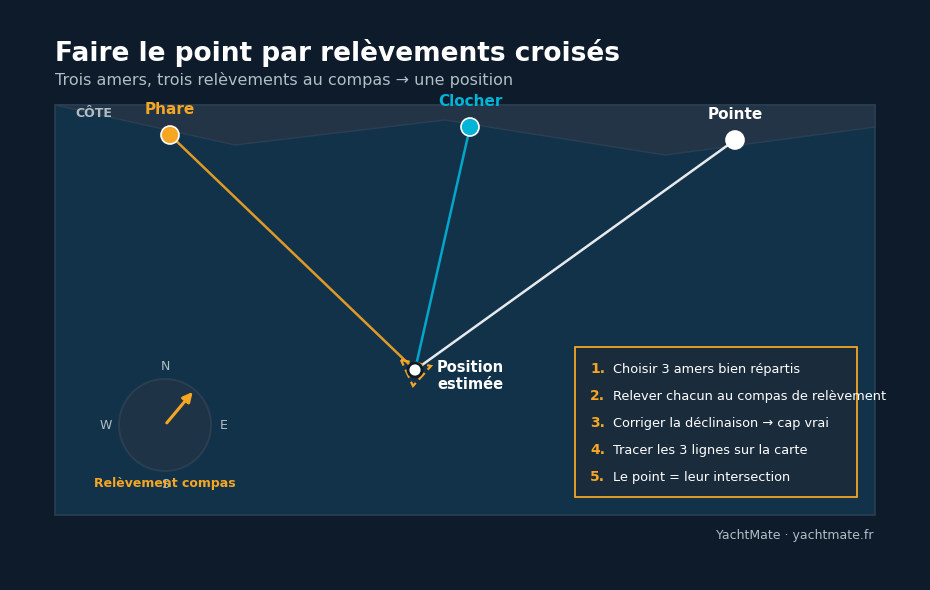
A bearing is the angle, measured from north, at which you see a prominent point on the coast — a lighthouse, a church spire, a headland. If you take a lighthouse on 040°, you know you must be somewhere along the half-line running from the lighthouse toward 220° (the reciprocal bearing). This line is called a position line: it reduces your uncertainty to a single dimension but is not enough to locate you.
Take a bearing on a second landmark and you get a second position line. The two lines cross at a single point: your position. A third bearing adds valuable security — if all three lines meet at the same place, confidence is total; if not, the small triangle they draw (the famous cocked hat) measures your margin of error.
Two landmarks give a position; three landmarks give a position and its reliability. At sea, that difference can be worth a keel.
2. The gear you need
The beauty of the method lies in how little it demands. You need:
- A hand bearing compass (pocket or prismatic type), graduated from 0 to 360°. Some handhelds also carry a reliable compass.
- The nautical chart of the area, paper or electronic, to plot on.
- A plotter or parallel rule and a pencil to transfer angles from the chart's rose.
- Something to note the time and the values: bearings are taken fast and written down at once.
The hand bearing compass is held at eye level, arm extended, sighting the landmark through the lubber line. You then read the magnetic bearing directly. Stand clear of the boat's metal masses (stanchions, engine, speakers) which distort the reading.
Always take first the landmark whose bearing changes fastest — the one nearest your beam. That is the one that "moves" most as the boat runs on: measuring it last would introduce the most error.
3. Choosing your landmarks well
The quality of the fix depends first on the choice of landmarks. Three criteria govern it:
Unambiguously identifiable landmarks
A landmark is only useful if you can find it for certain on the chart: a named lighthouse, a cardinal beacon, a water tower, a spot-height peak, the end of a jetty. Beware of "floating objects" (unfixed buoys that can drag) and soft-edged features where you cannot say exactly where the point begins.
Landmarks well spread in azimuth
This is the crucial point. Two bearings crossing at a right angle (90° apart) give a clean intersection; two nearly parallel bearings (20° apart) cross at a very stretched, imprecise point. Ideally, choose three landmarks about 60° apart from each other around you.
Near landmarks rather than distant ones
For a given angular error, a near landmark gives a more accurate position line than one on the horizon, where the slightest half-degree translates into hundreds of metres of offset. So favour foreground marks when you have the choice.
4. Taking and correcting a bearing
Once the landmarks are chosen, take all three quickly, almost back to back, so the boat has not moved much between measurements. Note each value immediately, with the time.
From magnetic to true
The compass gives a magnetic bearing, referenced to magnetic north. The chart is drawn relative to true north. You must therefore correct for magnetic variation, shown in the chart's compass rose (with its annual change). In European waters it is often small (frequently 1 to 3° West) but must not be ignored: a variation of 2° W is subtracted from the magnetic bearing to obtain the true bearing.
If you plot directly from the magnetic rose printed on many charts, you can transfer the magnetic bearing as it is, without conversion — often faster and less error-prone. The essential thing is consistency: never mix a magnetic bearing plotted on a true rose.
Write the day's variation in the corner of the chart table before you set off. Hunting for the value in the rose while rolling wastes precious time and multiplies calculation errors.
5. Plotting the fix and reading the cocked hat
For each landmark, place the plotter on its charted position and turn it to the bearing angle (true or magnetic depending on the rose you use). Draw the position line toward the open sea. Repeat for the other two landmarks. The intersection of the lines is your position.
Reading the triangle
The three lines rarely cross at exactly the same point: they usually form a small triangle, the cocked hat. Its size reflects the quality of your bearings:
- Tiny cocked hat (a few tens of metres): reliable fix, keep it.
- Medium cocked hat: take the centre of the triangle as your estimated position, staying alert.
- Large cocked hat: a sign of error (misidentified landmark, reading distorted by metal, variation forgotten). Start again.
Prudent rule near a hazard: when in doubt, take the corner of the cocked hat closest to the danger, so you assume the worst case and keep a margin.
6. Mistakes to avoid
- Confusing bearing and heading: the bearing aims at a fixed landmark, the heading is the direction of your bow. They are two distinct angles.
- Forgetting variation or applying it the wrong way: every line would be offset by the same angle.
- Taking bearings too slowly: between the first and last landmark the boat has moved; run the three measurements together.
- Choosing landmarks in line or too close in azimuth, which gives a blurred intersection.
- Taking a bearing near the engine or a metal mass, which deflects the needle by several degrees.
- Mistaking a drifting buoy for a fixed landmark: only firm land or an anchored structure makes a good mark.
The cross bearing is not a relic: it is a safety skill that costs two minutes and a pocket compass. Practise it in fine weather, while the GPS works, to compare the two positions: the day the electronics let you down, the routine will already be automatic and your confidence intact.
Navigate with peace of mind using YachtMate
YachtMate shows charts, landmarks and heading in real time — and helps you cross-check your position at any moment. Free.
Discover YachtMate