We happily talk about engines, sails and electronics, but rarely about through-hull fittings. Yet these discreet openings drilled below the waterline are among the very few parts of a boat whose failure can, on its own, put the hull on the bottom. Most boats that sink at the dock do so because of a neglected hose, clamp or valve. The good news: simple, regular maintenance is enough to remove that risk. Here is how to understand, inspect and service your through-hulls.
1. Why through-hulls matter
A through-hull is a deliberate hole in your hull. Its job is to let water in or out: engine cooling intake, sink and shower drains, marine toilet outlet, live-well, the speed log sensor and more. A cruising sailboat often has between six and twelve of them. Each one is, permanently, a door open to the sea, held back by a valve and a few centimetres of hose.
As long as everything is sound, the system is perfectly safe. The danger comes from neglect: a clamp that rusts, a hose that hardens and splits, a brass valve that corrodes from the inside and seizes. The classic scenario unfolds at the dock with the boat empty: a hose lets go below the waterline, the water rises silently, and nobody is there to close the valve.
A hull almost never sinks because of a dramatic impact. It sinks because of a ten-dollar detail nobody has looked at in three years.
2. Anatomy of a through-hull
A proper installation is made of four interlocking parts. The through-hull fitting itself passes through the hull: its mushroom head sits flush outside, its threaded barrel emerges inside. The seacock threads onto it: this is the safety device, letting you isolate the opening with a quarter turn. Then comes the reinforced hose, held by a double stainless clamp. Every link counts: one tired component and the whole chain becomes suspect.
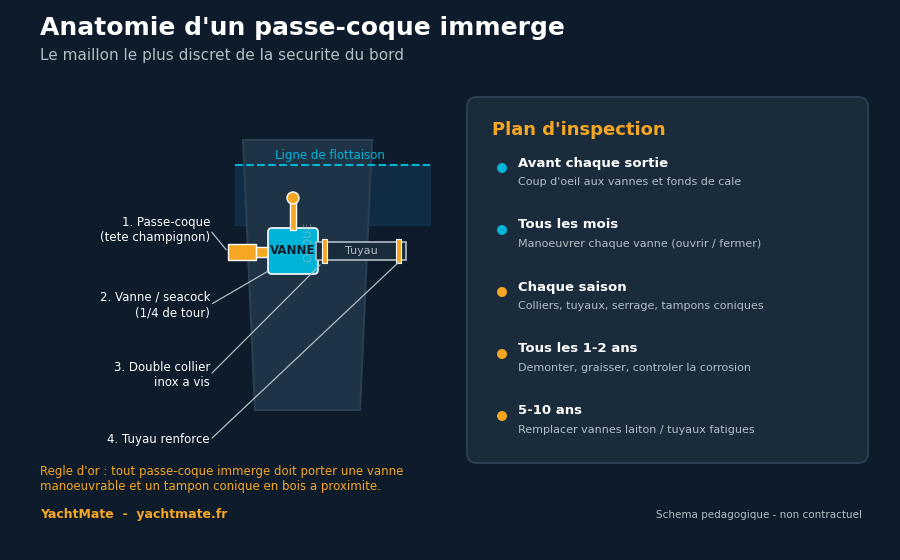
The fundamental rule is simple: every through-hull at or below the waterline must have an operable seacock, reachable without dismantling half the boat. An intake with no valve, or with a seized valve you can no longer close, is a major safety defect to fix as a priority.
Walk the boat and list every through-hull: location, function, material, condition. Kept within reach, this map will save you precious time the day you have to close a valve in a hurry.
3. Materials and lifespan
Not all through-hulls are equal, and the material largely sets their lifespan. The most common trap is brass, too often mistaken for bronze: underwater it slowly "dezincifies", loses its zinc and becomes as brittle as biscuit, sometimes in just a few seasons.
| Material | Indicative lifespan | Good to know |
|---|---|---|
| Marine bronze | 15 to 25 years | The classic benchmark, robust; watch for galvanic corrosion. |
| DZR brass | 10 to 15 years | Dezincification-resistant; acceptable if certified. |
| Ordinary brass | 2 to 6 years | Ban it below the waterline: weakens without warning. |
| Composite (Marelon) | 20 years and more | Immune to corrosion; operate it regularly. |
A simple test reveals dezincified brass: scrape the metal in a hidden spot. Healthy bronze keeps its golden tone; attacked brass shows a pink or reddish colour (bare copper) and crumbles. At the slightest doubt, do not gamble: replace it.
4. The inspection plan
Maintaining your through-hulls takes neither a workshop nor a rare skill: just consistency. The rhythm follows four levels.
Before every outing
A quick glance at the bilge and the accessible valves. No abnormal water, no weeping, no fresh green corrosion? You can cast off with peace of mind.
Every month
Operate each seacock: open, close, open again. This is the single most important maintenance habit. A valve that is worked stays supple; a valve that is forgotten seizes and becomes useless the day you need it.
Every season
Inspect the clamps (always double, stainless, not loosened), feel the hoses for hard or cracked areas, and check that a wooden bung sits beside each through-hull.
Every one to two years
Use a haul-out to dismantle, clean and grease the valves, check the metal and confirm there is no galvanic corrosion (anodes, bonding continuity).
Permanently tie a tapered wooden bung next to each valve with a lanyard. If a fitting fails, drive it into the opening with a mallet: the wood swells on contact with water and plugs the leak long enough to act.
5. Operating and servicing a seacock
A ball valve (the most common type today) works with a quarter turn: handle in line with the hose means open, handle across means closed. If the handle resists, never wrench it blindly and risk snapping a corroded ball: dismantle, clean and re-grease it at the first dry opportunity instead.
During a haul-out the ritual is always the same: close the valve, remove the handle, dismantle the body, clear deposits and verdigris, check the ball, apply a compatible marine grease, then reassemble and test. While you are there, systematically replace any rusted clamp and any hose that does not spring back when bent.
- Hoses: only reinforced hose rated for marine use, double-clamped; never garden or hardware-store tubing.
- Clamps: two per joint, 316 stainless including screw and band, fitted head to tail.
- Grease: a waterproof marine grease, never a product that hardens or attacks composite.
6. When to replace
Some signals do not forgive delay. Replace without hesitation as soon as you see one: a valve that refuses to turn or that spins freely, a pink metal that crumbles, a visible crack or porosity, a hard and cracked hose, rusted clamps, or simply an ordinary-brass through-hull fitted below the waterline. A fitting older than fifteen years whose history you do not know also deserves a thorough examination, if not preventive replacement.
Replacement is done with the boat out of the water. If you are not comfortable removing a bonded or glassed-in through-hull, leave it to a professional: the hull's watertight integrity depends directly on it.
7. If water comes in
If water gets in despite everything, the absolute priority is to close the relevant valve. That is exactly why they must stay operable and why you should know where they are with your eyes shut. If the valve itself has failed or the fitting has broken, drive the wooden bung into the opening and wedge it. Start the bilge pumps, identify the source, and head for shelter without delay.
Keeping a cool head means having prepared: knowing where each valve is, having bungs on hand, and having maintained the whole system so that, at the critical moment, everything responds. That is precisely what a little method, a few times a year, guarantees.
Three minutes of checks a month beat three hours of bailing in the dark. Your through-hulls ask only for a little regular attention.
Keep an eye on your hull, wherever you are
YachtMate keeps your maintenance check-lists, seasonal reminders and logbook in one place. Free.
Discover YachtMate